Load Data Instantly
Overview
It is quite likely that your campus has information in other systems detailing the courses your faculty teach, human resources-related information, and your faculty’s grants. You likely want to bring this information in Faculty Success to feed robust reports. Historically, we have offered two ways to achieve that: Data Import work requests and web services. This feature gives you the simplicity of using data import requests but now instantly loads qualifying files into Faculty Success without any waiting time.
Who has access to this feature?
This enhancement is available for Faculty Success Administrators with access to the Work Requests utility.
Why is this feature part of Work Requests?
This feature is an enhancement to the Work Requests utility because you may want to load files that do not qualify to load instantly as work requests. To keep things straightforward, we incorporated this into the process for submitting work requests.
How to use the Feature
Step 1: Prepare Data File for Upload
Requirements for Instant Import:
To increase the likelihood that the Data Import Request feature can instantly import your data, and to ensure that your data is imported as accurately and completely as possible, please ensure that your data import file is formatted as follows:
- The file must be saved as a comma separated values (CSV) file. CSV, also referred to as comma-delimited, is a file format in which each line is one record and the content for individual fields in a record are separated by commas.
- A single CSV file may only contain data for a single data collection screen in Faculty Success.
- You may only include data in your import file for individuals with user accounts set up to track activities in Faculty Success.
- Each column of your CSV file must contain a different piece of information, corresponding to a single input field in Faculty Success.
- The first column of your CSV file must contain a unique user identifier for the user account that will own the record in each row. Examples of identifiers you can use are the Faculty Success username, ID number or email address for the user account.
Please note: the unique identifier provided within the file must already be associated with accounts in Faculty Success. - The first row of your CSV file, the header row, must contain the field code in Faculty Success for each field to which you will import data. To find the code in place for each field, please refer to your Configuration Report, which is available on the Dashboard within Faculty Success and on the Data Import Request screen.
- When building your import file be aware of the field type and options accepted for each given field. The data provided in your import file must exactly match these attributes in order for the import to qualify for instant import. Here are a few common examples of cases like this that you may encounter:
- Drop-down lists: Values provided within an import file for a drop-down field must exactly match the predefined options for that field.
- Numeric fields: These fields expect data to contain only numbers. Including alpha characters in a value for this type of field will cause the import to error.
- Integer fields: Integer fields expect whole number values. If your import file contains decimals within the values for this field, the import will fail with a validation error.
- Date fields: Date fields are often broken apart into components, such as term and year or month, day and year. Each element is then stored separately and is subject to different parameters for acceptable values. For example, term and month fields are drop-down lists, while day and year are numeric fields. Your dates must be parsed into the relevant columns and formatted accordingly.
When is it better to submit the file to Faculty Success as a work request?
- When you need to modify field attributes in order to import your data.
Importing new data may require that you add options to a drop-down list or modify other field attributes to accommodate the new data. In such a case please submit the file via a work request and we will make those changes as part of importing your data. - When you need to import data to a screen with Dynamic Sub-Answers (DSAs).
At this time, you are able to import data files using the CSV Data Import feature only if your file does not contain fields that reside within DSAs. Data for DSAs can still be imported by submitting a Data Import work request. Please consult your solution specialist for information regarding creating a flat file for screens with checkbox values.
Note: Data import files submitted to Faculty Success for processing via a work request must contain more than ten records. - When you need to import data to a screen with a checkbox list.
Data for checkbox values can still be imported by submitting a Data Import work request. Please consult your solution specialist for information regarding creating a flat file for screens with checkbox values.
Step 2: Uploading File for Import
Once you have a file formatted according to the requirements described above, supply the file as follows:
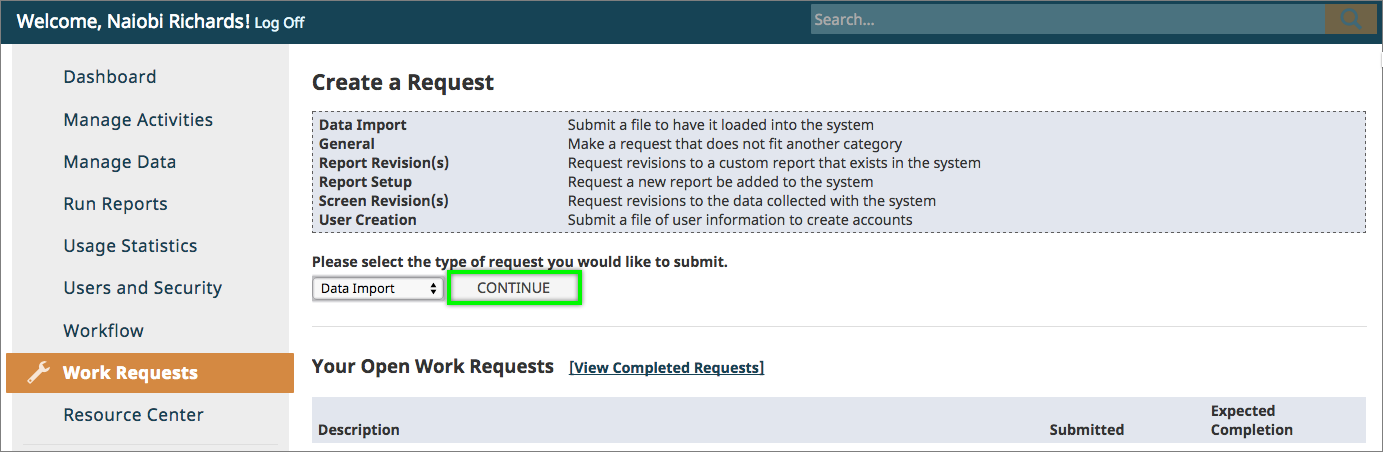
- In Faculty Success, select Work Requests in the Left-Hand Menu.
- Select Data Import from the drop-down list of work request types and select Continue.
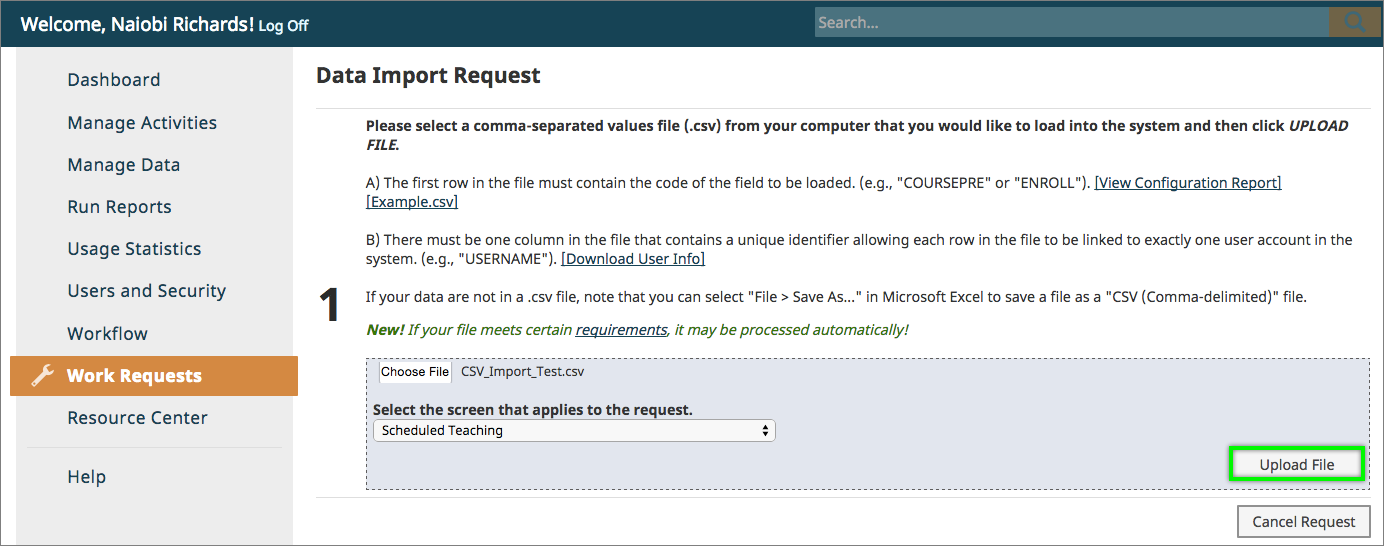
- In Step 1 in the Data Import Request page, select Browse and choose the file you want to import.
- Select the screen to which your data import applies and select Upload File.
- At Step 2 in the Data Import Request page, select the column name that corresponds to the file's unique user identifier and select Check Users.

- We will compare the contents of the column selected to the existing user account information in Faculty Success.
- Each person in the file on whose behalf data will be imported must have an Faculty Success user account that is set up to track activities, and the unique user ID in the file must be associated with that person in the Faculty Success instrument.
- Each person in the file on whose behalf data will be imported must be within a college for which you have the Work Requests permission.
- If any of the user identifiers fail to match with an Faculty Success account for your campus, or the user is not set up to have activity tracked, Faculty Success will display an error message and stop the file import process.
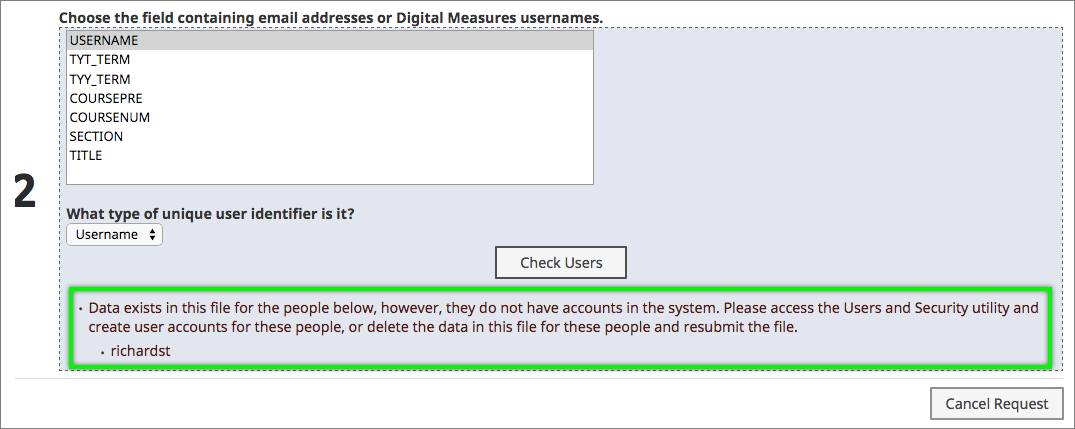
To continue, select Cancel Request and then either create a user account for this user, enable activity tracking for an existing account or delete the row from your CSV file and import the revised file.
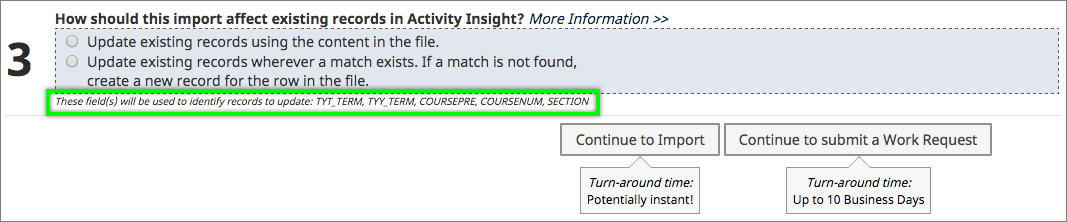
- When the check of the users in your file is successful, you will proceed to Step 3 to select how your import should affect existing records in Faculty Success. Your options are:
- Do not affect existing records. Create new records from the rows in the file.
- Update existing records using the content in the file.
- Update existing records wherever a match exists. If a match is not found, create a new record for the row in the file.
Note: For those of you already familiar with the Data Import work requests utility, here is a quick map from the old values to the new ones:
Old Value New Value Create new activity records Do not affect existing records. Create new records from the rows in the file. Update existing activity records Update existing records using the content in the file. Create new activity records and update existing activity records Update existing records wherever a match exists. If a match is not found, create a new record for the row in the file.
- Upon selecting an option from Step 3, you can choose to Continue to Import or Continue to Submit a Work Request.
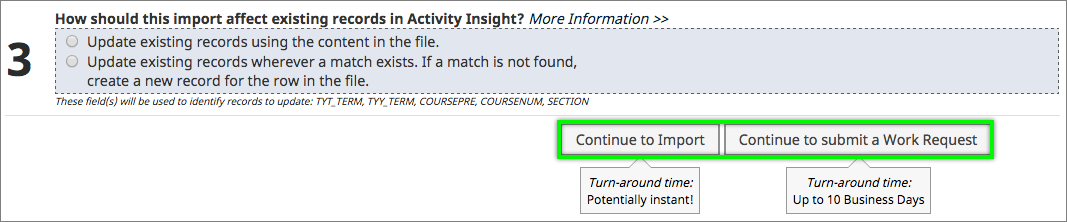
- Selecting Continue to Import will trigger the validation of your file against your current screen configuration.
- If no errors are found, Step 4 will quote the number of records to be created and/or updated. Simply select Import and your data will instantly import.
- If no errors are found in Step 4, but the quote of records to be created and/or updated does not correspond to your expected results, you are able to click within Steps 1-3 to modify the selected options. By clicking through the previous steps, you are also able submit the file as a work request if needed.
- If there are errors present in the file, error messaging will appear within Step 4 to clarify each issue and possible next steps. You can either modify the file to correct the errors and submit it again or submit a work request.
- If you select to update existing records within Step 3, it is important to note that you may hit the record limit when importing your file. The import tool will search through a maximum of 20,000 records to find a match for the records in your file. If your file contains too many records, or if the screen to which you are importing contains a significant amount of data, you could hit this 20,000 record limit. A validation error message will display if you hit this limit. To resolve this error, split your file into two or more files so that the number of records for the import is smaller, and import again. Alternately, you can Continue to Submit a Work Request and we will split your file for import when we process the request.
- If you select Continue to Submit a Work Request, the utility will prompt you to provide a title for the work request and supply any notes and ancillary files. You can then select Submit Data Import Request to send the file and any additional notes to Faculty Success. By selecting this option, a work request will be created. Please note that the request is subject to the standard turnaround timeframe of up to 10 business days.
- Selecting Continue to Import will trigger the validation of your file against your current screen configuration.
How can I view data import files submitted?
- Work requests will only be created for Data Import files sent when selecting Continue to Submit a Work Request. In these cases, you can review the files submitted by accessing the work request created for the import and retrieving the submitted file.
- Files submitted using Continue to Import do not generate a work request, and therefore will not be listed in your log of work requests for later review. If there are any concerns or questions regarding files imported, please contact your Solution Specialist.
Working with Data in CSV Files
Note: The content of this section can also be found in our Faculty Success Administrator's Guide. We have included it here for easy reference.
If you need to edit the content of a CSV file before submitting it – to modify column headers, delete unnecessary columns or data, etc. – watch closely how the CSV editor you have chosen to work with interprets the data in your file. In particular, watch for places where your raw data contains:
- Leading zeroes
- Page ranges
- Field values that contain commas
- Field values that contain quotes
If you have chosen Microsoft Excel for working with CSV files, watch out for the auto-formatting function in the program, as this function impacts how data with leading zeroes and ranges of page numbers are viewed and will be saved in the edited CSV file.
Leading Zeroes in CSV Files
Depending on how you open and work with a file in Microsoft Excel, data with leading zeroes may be altered as part of opening and re-saving your CSV file. Microsoft Excel seeks to apply formatting to files opened in the program. Because CSV files do not contain formatting, upon opening a CSV file in Excel the program will use its own formatting rules to auto-format the content of your file. If you have, for example, course numbers that always consist of six digits, some of which have leading zeroes, Excel will interpret this column as containing numbers and will strip the leading zeroes from those values. A value of “000101” will be auto-formatted as “101”. When you save the file, the leading zeroes will remain stripped out, leaving this value as “101”.
One way to prevent this automated formatting is to import your CSV file’s data into Microsoft Excel, rather than opening the file directly with Excel. Importing gives you the option to select the data format for each column, and if you select "Text", this will preserve your leading zeroes while you work with the file, as well as when you save the edited file.
To import a CSV file in Microsoft Office Excel 2007 or 2010:
- Open Microsoft Excel.
- Navigate to the Data tab, and select From Text in the Get External Data portion of the ribbon.
- Locate your CSV file and select Import.
- In the Text Import Wizard, verify that you have selected Delimited and that other parameters in the wizard are correct. Select Next.
- Select Comma in the list of Delimiters and select Next.
- Choose Text as the column data format for the relevant columns in your file and select Finish.
- Choose where you want your imported CSV data to appear in your workbook and select OK.
To import a CSV file in Excel for Mac 2008:
- Open Microsoft Excel.
- Navigate to the File menu, and select Import.
- Select the type of file you want to import – most likely CSV File.
- Select Import, select your file from the Choose a File pop-up and then select Get Data.
- In the import wizard, verify that the parameters selected are correct.
- Choose the File Type that best describes your data: Delimited
- Start Import at Row: 1
- Select your delimiter(s): Comma
- Specify Text Qualifier: "
- Select the Column Data Format for your data columns, selecting Text where auto-formatting should not format data.
- Select Finish, and select where you want to put the data.
If you end up submitting your import file in a work request to Faculty Success, be sure to note for each import request the columns in your CSV file that have a fixed number of digits and the number of digits each value should have. This will enable us to confirm that those columns contain the digits needed to import your data correctly before the file is processed.
Page Ranges in CSV Files
Opening a CSV file in Excel may also result in certain data being formatted as dates. For example, Excel will automatically convert a page range of "1-10" into "10-Jan". This conversion also affects the underlying data: converting "10-Jan" back to text results in a number such as "40553", which is how Excel stores this date. To convert this back to "1-10", you must change the column format to 'Text' and re-enter "1-10" manually.
Alternatively, you can use the process outlined in the Leading Zeroes in CSV Files section to import the CSV file into Excel and apply “Text” formatting to the appropriate columns.
Handling Commas that are a Part of a Field Value
When commas are contained within the data, but you have not enclosed the value in which they appear in quotes, these commas are interpreted as field delimiters. If your data contain commas you will need to use quotes to enclose the field's contents to prevent the comma in the middle of your value from being treated as a delimiter. If you do not enclose values containing commas by quotes we will not parse the file correctly, resulting in data that we cannot correctly correlate to the appropriate column header, and if we were to load it, it would not load into the correct field on the screen.
Handling Quotes that are a Part of a Field Value
When double quote marks are contained within the data, you must escape them by preceding each double quote mark with an additional double quote mark. You must enclose the entire contents of that field in double quote marks. This prevents the quote mark within the field from being used to mark the end of the data for the field.
Note: For additional details and examples, see this web page.
Handling for Special Characters
You may import special characters — such as Greek or Latin characters, accent marks or other diacritical marks — into the system from another source as long as they are Unicode-compliant. Unicode is an industry standard set of characters that allows computers to consistently represent and manipulate text expressed in any of the world's writing systems. For more information about Unicode, please see this web page.
Examples of fonts that are Unicode-compliant include Arial and Times New Roman. Examples of fonts that are not Unicode-compliant include Symbol and Wingdings. If characters are not transferring to the system as you expect, try changing their font in the source software application to Arial or Times New Roman and then copy and paste the text into the system. If this corrects the issue, resubmitting an import using a Unicode font will update the values previously supplied to be Unicode-compliant.
For answers to questions not listed here, please contact us.